How to Beat Queen's Hand Trial
Learn how to beat Against the Storm's ultimate challenge: the Queen’s Hand Trial. This guide explains why QHT is so tough and shares tips and tricks to help you reach the final Seal with less effort.
Updated by SinglePlayer in Against the Storm
Intro
In this guide, I'll share the strategies I use to successfully complete a Queen's Hand Trial - how to get started and navigate the World Map toward the Adamantine Seal.
This article is best suited for players who have already completed the main campaign. If you're new to Against the Storm, I’d recommend holding off on this guide for now. You’ll probably find my Beginner’s Guide and Advanced Tips on the website more helpful.
What is Queen's Hand Trial
Queen’s Hand Trial (QHT from now on) is a very difficult Ironman (permadeath) mode. You only get one cycle to reforge the Adamantine Seal; losing or abandoning even a single settlement ends your entire attempt with all the progress you made.
How to Unlock the Mode
QHT is unlocked after you break the Adamantine Seal (the Prestige 20 seal) in the main game. Once that’s done, enter the Smoldering City and claim your reward in the Deeds tab. Then create a new Queen’s Hand profile and sign the Queen’s contract to start the challenge.
Key Restrictions and Challenges
You start pretty much fresh at the Smoldering City, with none of the meta-progression upgrades. That means no bonuses to impatience reduction, production speed, or walking speed - and no double yields. You begin with very few starting resources, no grace period, and your Ancient Hearth is locked at level 1. You do have trade routes, consumption control and rain engines unlocked, though.
General Strategy
Since you're starting out very weak, it’s a good idea to begin on lower difficulties. But that comes with a trade-off: easier difficulties reward fewer Seal fragments, which are required to break the final Seal and win the Trial.
So the key is to find a balance - choosing a difficulty that’s manageable but still rewarding enough to keep your run moving forward.
My preferred difficulty for the first settlements is Prestige 2–5. I switch to Prestige 10 and higher (where the trader debuff kicks in) once I have built up some starting resources from World Events.
World Map Navigation
Planning your route across the World Map is just as important as managing your settlements. Clever pathing can make your entire Queen’s Hand run go much smoother.
The first thing you’ll want to do is complete as many map modifiers as possible, since they reward you with Royal Resupply and upgrade materials (Food, Machinery, and Artifacts). I highly recommend focusing on modifiers that give Machinery, as it's usually the most limited resource.
Don’t rush straight toward the final Seal. Instead, build your route in a spiral around the capital. Settling near the capital has several key benefits: you get more embarkation points to spend on the expedition, and you can choose any difficulty level - including the easier ones.
When placing settlements, try to uncover as many points of interest (the question mark tiles) as possible to reveal more map modifiers or world events.

Royal Resupplies
You need 105 Seal Fragments to break the Adamantine Seal, and you only have 92 years to collect them. Choosing the +4 Seal Fragments reward from Royal Resupply is a decent pick - stocking up on fragments early gives you more flexibility later. That said, you don’t need to pick fragments every time. There are plenty of map events that give you free Seal Fragments with little to no cost, so you can afford to mix things up.
Another great reward to consider is +2 movement range, which helps you reach distant world events that offer powerful permanent buffs. It can also save your run near the end, when you're almost out of time and need to reach the Seal as quickly as possible.
Just make sure to do the math once you're deep into your run. Estimate how many towns and map modifiers you have left, and plan your resupply rewards accordingly. If you already have enough fragments and plenty of time left, you can start choosing +4 embarkation points instead - they’ll make your final few settlements a lot easier to manage.
World Modifiers
Each map modifier adds a custom penalty to your settlement, and some of them are a lot harder to deal with than others. For example, the Bandit Camp disables both trading and trade routes - easily one of the toughest challenges. Without trading, you'll almost certainly run short on building materials for construction and luxury goods for solving Glade events. Relying mostly on your own production and random caches, it can easily cost you a couple of extra years - in the best-case scenario.
Some of the hardest modifiers, in my experience, include no trading, no orders, no pause, and anything that speeds up impatience gain. The safest approach is to avoid these tiles entirely. You can also reduce the difficulty or invest more embarkation points to beat them - just be ready for a tough challenge.
On the other hand, some modifiers are easy to work around and even borderline beneficial. For example, Barren Lands removes Fertile Soil from the map, but that’s manageable - just ignore farm production and focus on gathering camps for raw food instead.
Below is a full list of world modifiers, ranked from hardest to easiest based on my personal experience:
You are unable to use the pause function.
Seasoned RTS players with high APM might breeze through this modifier without noticing its difficulty. For everyone else, the Shattered Obelisk creates a constant time crunch, making micromanagement feel overwhelming. Tasks like moving woodcutters’ camps, assigning workers, or changing production queue can eat up precious time. It’s easy to miss a wandering trader or a critical event while you’re caught up in routine settlement tasks. It’s even harder for players who don’t know the game inside and out and have to read tooltips while workers stay idle.
Orders are disabled.
If you’ve ever been frustrated by failing to complete a timed order, imagine missing all of them. The Fishmen Ritual Site modifier makes for an painfully slow start, as you struggle to unlock early building recipes typically earned through reputation from orders. The endgame could also become brutal - relying solely on Resolve to gain reputation points becomes a nightmare when the Decadence mechanic pushes the minimum threshold to extreme levels.
Neither Trading nor Trade Routes are available.
As mentioned earlier, trading is very useful, providing flexibility throughout the game. Without it, you're forced to rely on your own production and whatever you can pull from caches.
Only Forbidden Glades can be found.
This modifier is a high-stakes gamble. Every Glade you open is a Forbidden Glade, meaning each expansion carries serious risks. If luck is on your side, your first Glade might be manageable - but if not, a bad event can stall or even doom your settlement.
The safest strategy is to delay opening your first Glade until Year 2, when the trader arrives. That way, you’ll have a better chance of resolving the event using luxury goods or tools from the trader.
You start with 50-150 Hostility points.
Starting with +150 hostility is a big penalty - especially during storms, so expect to lose a few villagers early. Outside of storm season, though, it’s less dangerous.
You’ll want a way to reduce hostility long-term. Look for helpful Cornerstones or buildings like the Monastery or Temple. If you can’t reduce hostility, you’ll need to be careful not to push it even higher - take fewer newcomers and avoid opening too many Glades.
Consumption control and favoring species are disabled.
Not being able to favor species is more impactful than it sounds - especially during storm seasons, when favoring is often the only way to prevent villagers from leaving. Losing access to consumption control can also catch you off guard, especially if you're used to toggling food and services to stretch your supplies.
Gain twice the Hostility each year, but every time a villager leaves or dies, Hostility decreases by -15 points.
This modifier adds an additional 45 hostility per year, which becomes noticeable after just a couple of years - late-game storms get much more dangerous. While you do get some hostility reduction when villagers leave, it's not worth always relying on, since you’ll also take Impatience penalties for losing people. The best way to deal with this is to finish settlements faster before the pressure gets out of control.
Impatience grows 50% quicker, but every ongoing trade route reduces the Impatience generation speed by -20%.
At the start of your QHT, with no upgrades to reduce impatience, this modifier adds 0.4 impatience per minute - nearly 5 impatience per year. Trade routes can help slow it down, but early on, you likely won’t have much to sell.
To offset this speed, prioritize Humans for their Firekeeper perks, and consider staying below Prestige 15 to benefit from the -1 impatience per reputation point bonus.
Start with 6 Impatience.
Like Land of Greed, Sparkdew Crystals adds Impatience pressure - but because you start with 6 impatience, you also receive a useful -90 hostility (6x15) to make storms more bearable.
Every Dangerous and Forbidden Glade contains two threats.
Double threats sound bad - but they also mean double rewards for just 30 hostility from opening Glades. Open Glades one at a time, and bring service goods like Incense or Tea to solve both events before their deadlines.
You can choose from 1 fewer cornerstones.
This modifier reduces your Cornerstone choices - not ideal. But if the offered option doesn’t suit your build at all, just take 10 Amber and buy something better from the trader.
No resources will be refunded after destroying a building.
It’s easy to forget this rule and lose all the resources invested in the building out of habit. More of an attention test than a strategic challenge.
There is no fertile soil anywhere in this region.
No Fertile Soil means farming is off the table. The obvious solution is to shift your food source to gathering camps. Thankfully, the chances of getting an upgraded version of a camp are much higher as farms completely removed from Blueprint offerings. This modifier is extremely good in Marshlands with small amount of Fertile Soil and unique Giant resource nodes.
If you combine gathering with event/cache rewards, you’ll barely miss the farms.
Dangerous and Forbidden Glade warnings are disabled.
For an experienced player, these rules are no big deal. You can still identify Small Glades by size, and Forbidden ones are usually far from the starting area.
Only Dangerous Glades can be found in this region.
Every Glade is a Dangerous Glade, and that’s not a bad thing. Small Glades usually aren’t worth opening anyway, and Forbidden Glades are often too risky.
The radius of Hearths is reduced by 3 fields.
This one actually helps. It reduces Hearth radius, which allows you to build Hearths closer together.
Hostility doesn't grow with each passing year, but you'll gain 2-6 more Hostility Points per villager.
Hostility no longer increases over time - it only comes from villagers. That gives you more control and makes the game easier the longer it goes. Just be careful not to grow your population too quickly.
Every year, the storm lasts +10% longer.
Each year’s storm lasts longer, which stretches out the entire year. That’s actually a good thing in many cases - you get more time to produce goods.
World events
World Events are special map nodes that offer unique rewards (usually added to your caravan's starting bonuses). Some act like extra challenges - you’ll need to meet certain conditions during a settlement to earn the prize. Others are simple, instant trades for meta-progression resources or goods.
The key difference between a World Event and a World Modifier is that you get the full reward from an Event no matter the difficulty, even if you're playing on the easiest setting. Keep that in mind - you can lower the difficulty to make tough events easier or to speed up your run.
Below is a list of the most notable events based on my own experience. For a full list, check the official Wiki.
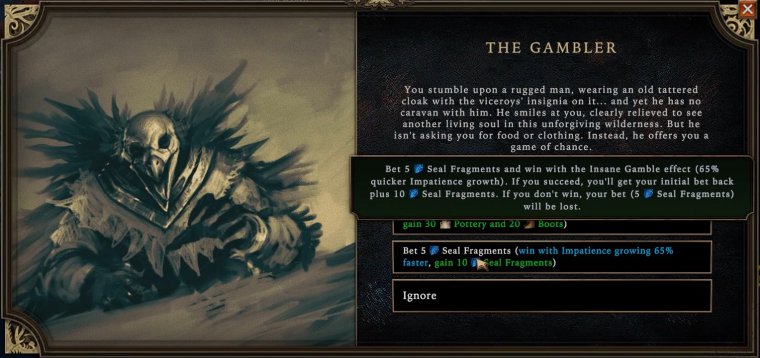
The second option in this event is more rewarding - but also one of the riskiest. It’s more appealing to players who are behind on Seal Fragments and willing to go all-in. Choosing it gives you +65% Impatience Speed, meaning your settlement has to grow extremely fast. There’s no room for mistakes.

I’ve never picked the first option - the food loss is just too severe. The second option offers a much better reward, but the conditions are tough: no Orders, and slower traders. This event is worth dropping in difficulty all the way to Settler or Pioneer if early enough in the cycle.
You’ll need to generate most of your Reputation through high Resolve. To help with that, open caches with Tools and pick Reputation as a reward from Glade Events whenever possible.
In my last run, I chose to spend 10 Artifacts to select a World Modifier. I went with Gathering Storm; longer storms can help shorten the total number of years you need to finish a cycle, and the reward gives you both Artifacts and Machinery, which is a great deal.
This mercenary event kills 8 of your villagers at the start of Year 8. If you’re getting stuck in a settlement that long on average, you’re doing something wrong – and wasting that much time usually means losing the entire Trial.

I highly recommend unlocking the +30 Seconds Grace Period upgrade before attempting this event. That way, when you start sacrificing villagers, the Impatience spike won’t immediately end your run. If you don’t have that upgrade, keep your Impatience as low as possible so you have some breathing room when 10 villagers die.
As for how to actually kill villagers:
- The easiest method is toggling an event that kills one villager each time you start investigating it; do this 10 times.
- Deadly Glade Events can also do the job - send villagers into the explosion radius.
- Leaving Blightrot untouched during storm and letting the corruption bar fill is a consistent way to kill 3 villagers.
- Robbing traders - you’ll lose 2 to 5 villagers per attempt.
- Starvation also works, but it’s slow and unreliable. Villagers may leave the settlement due to low Resolve before they die of hunger.
- The most efficient method is to use the Forsaken Altar - it lets you sacrifice villagers instantly while granting powerful cornerstones in return.
Citadel Upgrades
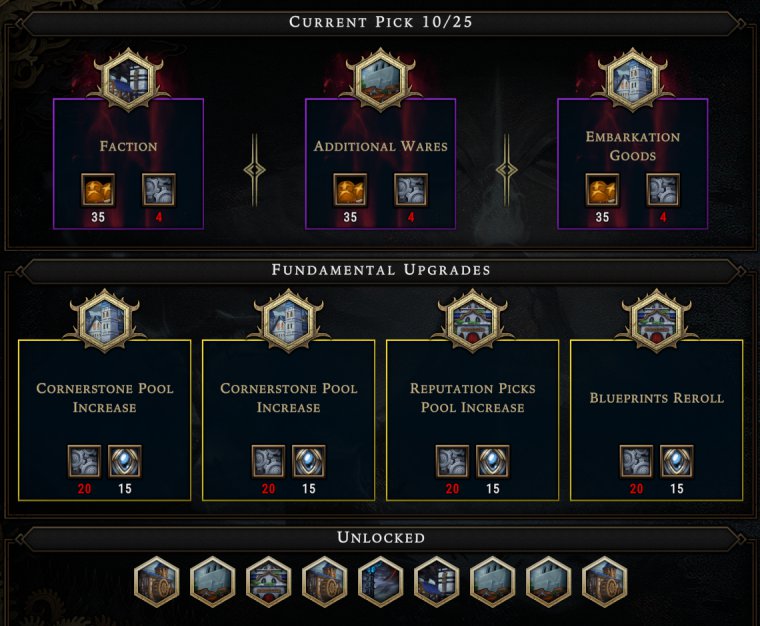
As you win settlements and gather Food, Machinery, and Artifacts, you’ll be able to unlock up to 25 upgrades at the Citadel. These aren’t presented as a tree anymore - instead, you choose from a set of three random options, kind of like picking a blueprint or a cornerstone.
There are also four Fundamental Upgrades that increase your Cornerstone and Blueprint choices. They’re expensive and low-impact early on, when you still have two or three options by default, but they become crucial at Prestige 12 and above. Without them, you’ll be stuck with just one option.
While the total number of upgrades in Queen’s Hand Trial is much lower than in the base game (29 vs. 93), each one can make a huge difference. Here are the most impactful upgrades I tend to prioritize:
- Upgrade Ancient Hearth to Neighborhood (Level 2) and District (Level 3) is almost mandatory. Since you need to build housing anyway, adding a few decorations is a small price to pay for permanent buffs like increased production speed and +1 Resolve for every villager.
- +5 Starting Building Materials (Planks, Bricks, Fabric) – helps you avoid the inefficient Crude Workstation early on.
- +20% to all Embarkation Resources – this applies to both free and purchased resources at embarkation start. Doesn’t affect resources from World Events, though.
- Mine Upgrades Unlocked – especially useful in the Ashen Thicket biome, where mining plays a significant role.
- +1 Trade Route Slot – gives you more flexibility and trade options.
- Last Stand – 30-second grace period. At least one of these is highly recommended to prevent sudden losses from hitting the impatience cap.
Less impactful upgrades I usually skip:
- +1 Farm Range – if your Fertile Soil area is too wide, two workers won’t keep up anyway and it’s often better to build a second farm.
- +1 Charge on gathering nodes – a small bonus that makes no meaningful difference.
- Species Housing Unlocked – early on, I stick to shelters since species houses are expensive. Later in the run, there are more efficient ways to boost Resolve. However, Harpies are a reasonable exception. Their low base Resolve, low threshold for Reputation gain, and cheap houses make them a strong consideration for housing unlocks.
- Trade Route with one of the Factions – useful in your first few settlements when there aren’t many neighbors, but it completely loses value after 3 games.
Special Mention:
- +2 Embarkation Points – If taken early in the cycle, this is one of the best upgrades for the Trial - extra points help you speed up your economy and finish settlements faster. However, the upgrade is not worth taking once you’re deep into the cycle. The distance penalty usually reduces these points to zero.
Final Seal

The Sealed Forest is the last and hardest part of the Queen’s Hand Trial. Here are a few quick tips to help you prepare:
- Avoid chopping too many trees. Focus on big ones and only cut small ones when opening new glades.
- Find a better fuel source than wood. Sea Marrow can be found in the biome, while Coal and Oil can be produced with the right buildings.
- Stick to a winning plan from the start - all four requirements are the same in every Sealed Forest attempt.
- Build the Forsaken Altar to gain powerful bonuses. It can completely solve your food or hostility problems and let you focus fully on the mission’s goals.

Ysabelle, Priestess of the Forsaken Gods by Damian Ziomek
Conclusion
Hopefully this guide helps you become the Queen’s Hand. Good luck out there! You can ask questions or share your tips in the comments!
Thanks to the Reddit Against the Storm community for sharing their experiences; special thanks to moreON for additional insights and corrections.


