Against the Storm Beginner's Guide
Learn how to play Against the Storm with this beginner-friendly guide. Build your settlement, manage resources, and survive the storm.
Updated by SinglePlayer in Against the Storm
Intro
Against the Storm is a unique blend of two genres: a city-builder and a roguelike. Unlike traditional sandbox city-builders that focus on long-term progression, Against the Storm challenges you to create short-lived but efficient settlements under time pressure.
Each game session (or "run" in roguelike terms) lasts roughly 2–3 hours. You’ll lead a caravan of villagers into a procedurally generated rainy forest, where you’ll manage resources, tackle random challenges, and complete objectives to earn favor with the mysterious Queen. Success unlocks progress on the world map and access to permanent upgrades.
This guide provides an overview of the core mechanics to help you start winning your early settlements.
World Map
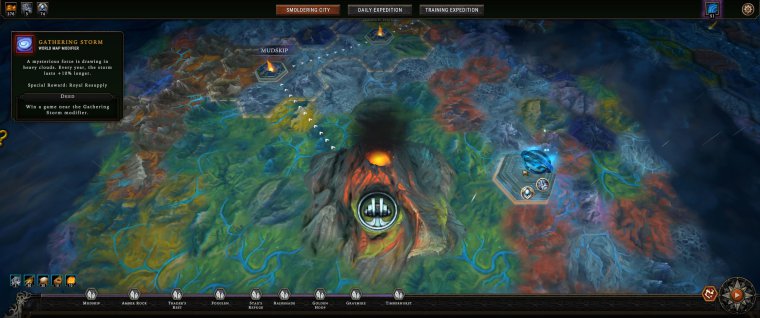
The world map is where you plan your overall progression. At the center is the Smoldering City, your persistent capital. Around it lies a procedurally generated wilderness, segmented into hexagonal tiles. Each tile represents a potential settlement site with a specific biome and difficulty modifiers.
From this map, you choose a tile to place your next settlement. As you expand outward, your settlements form paths that lead toward Seals - special tiles that can be broken once you’ve collected enough Seal Fragments along the way. Breaking Seals (e.g., Bronze, Silver, Gold, Adamantine) functions like a final boss fight for the current Cycle.
Core Gameplay
The core gameplay loop of Against the Storm revolves around building individual settlements from scratch. Each settlement starts with a small group of villagers and limited resources.
Your objectives are:
- Complete Orders.
- Keep villagers alive and productive.
- Manage rising Hostility.
- Explore surrounding Glades.
Once you earn enough Reputation, the settlement is considered successful. You’ll return to the World Map, where you can move further away toward the magical Seals and spend earned resources to unlock new upgrades in the Smoldering City.
Difficulty Levels
Against the Storm features four base difficulty levels:
- Settler
- Pioneer
- Veteran
- Viceroy
These difficulties differ in the number of Forest Mysteries and the overall complexity of Orders.
On top of these, there are 20 Prestige Levels. Each Prestige level adds a unique modifier that makes the game harder. These modifiers are cumulative, meaning Prestige 5 includes all effects from Prestige 1 through 5.
Some notable examples of Prestige modifiers are:
- Villagers consume more food
- Buildings cost more to construct
- Trade goods are worth less
You unlock higher Prestige levels by winning settlements. The farther a region is from the capital, the higher its minimum difficulty requirement, ending in Prestige 20 for the final Adamantine Seal.
Starting a Settlement
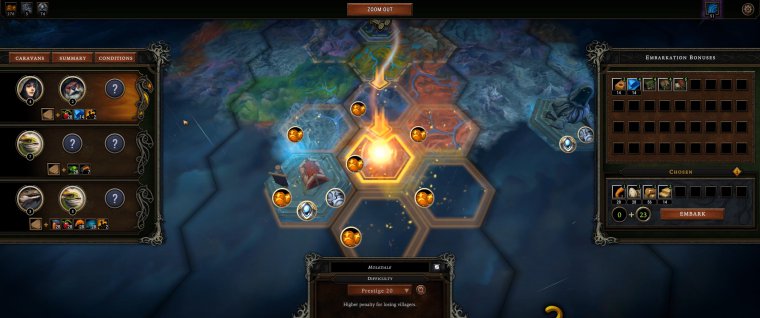
Every run in Against the Storm begins with starting a new settlement - or "Embarking on an expedition," as the game calls it.
Your choices before the start include:
- Selecting a biome with its specific set of resources
- Choosing a tile with unique world modifiers
- Picking a Caravan with starting supplies and a mix of species
- Spending Embarkation Points on additional bonuses to cover what your Caravan lacks
- Setting the difficulty level of the expedition
Once you click Embark and the game loads, you appear in a starting Glade containing:
- An Ancient Hearth (the central campfire where villagers rest)
- A Main Warehouse (the default drop-off and storage point)
- A few random resource nodes (e.g., eggs, stone, fertile soil)
Your first actions should be:
Place Woodcutters’ Camps
These allow villagers to cut trees - your basic fuel, construction material and a frequently used ingredient in production. Place camps near trees but close enough to the Warehouse. Avoid opening surrounding Glades immediately, as this increases Hostility and triggers Glade Events you’re likely not ready to complete with starting resources. Delay this until you’re better prepared, typically around the start of Year 2.
Build Housing
Shelters house three villagers each. Build enough to ensure no one is homeless, as villagers without shelter are at risk of leaving due to low Resolve during the Storm season.
Lay Down Paths
Roads increase movement speed. Basic dirt roads are free, so lay down a simple grid connecting the Hearth, Warehouse, and camps. Villagers frequently travel these paths to rest at the Hearth or deliver goods to the Warehouse.
This initial phase typically lasts 3–4 minutes of game time.
Blueprints
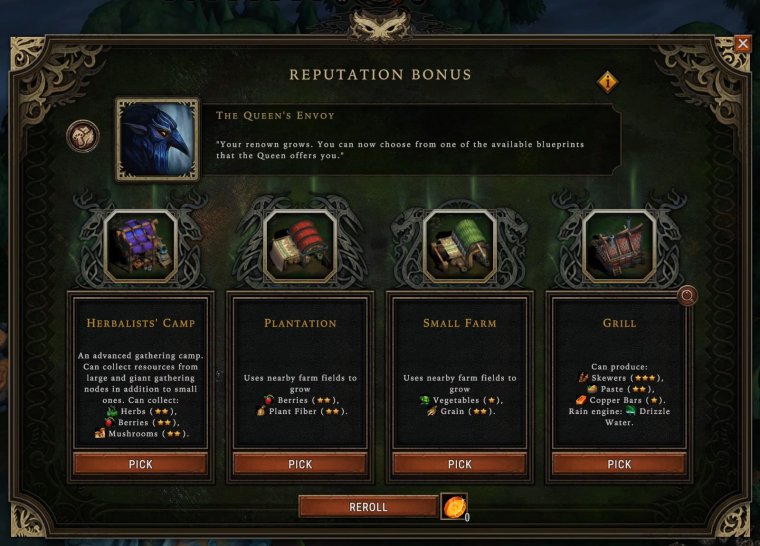
Blueprints are the key to unlocking new buildings in the game. At the start of a run, you only have access to a few basic structures. As you earn Reputation, the game offers you a choice of several blueprints to expand your options.
Most blueprints fall into the following categories:
- Improved Camps: Structures designed to gather materials from large resource nodes.
- Industry: Buildings that transform raw materials into building materials or other higher-level goods.
- Farms: Structures placed on fertile soil to produce raw food or crafting materials through planting and harvesting stages.
- Food Production: Buildings that process raw food into complex meals.
- Services: Buildings that allow villagers to consume refined goods to increase their Resolve.
Blueprint choices are randomized, and this is a key part of the game's design. You can’t rely on a fixed build order for every run - instead, you must adapt to what you’re given. Each game session challenges you to deal with uncertainty and make the most of unexpected combinations.
Cornerstones
Cornerstones are bonuses that shape your strategy during a settlement run and make each one unique. You’ll be offered a random selection of Cornerstones at the start of each year, and you can choose one to permanently improve your settlement. If none of the options fit your current setup, you can skip a Cornerstone and receive Amber instead.
You can also acquire Cornerstones from Traders and Events. A full list is available on the wiki.
Cornerstones can give:
- Extra production (e.g., gain +2 Berries from gathering and farming)
- Extra resources (e.g., gain 3 Oil for every 10 Flour produced)
- Production boosts (e.g., +50% to goods produced in the Plantation)
But, most Cornerstone perks are unique and hard to categorize. Some synergize with your chosen species or biome; others can completely change your strategy. A good example is the "Trade Hub" Cornerstone, which allows you to win the game by selling everything to traders.
You can’t control which Cornerstones appear, so it’s important to adapt your build to the bonuses you receive.
As your economy scales up and bonuses stack, Against the Storm shifts from tense early-game survival into late-game surplus - much like other roguelikes that reward smart early decisions with a powerful endgame snowball.
Reputation and Impatience

Reputation is the main win condition in the game. Filling the Reputation bar completes your run (except for final Seal missions).
Even a single Reputation point is valuable - reaching a blue diamond on the bar grants a new Building Blueprint choice, for more strategic options as you go.
You earn Reputation primarily through:
- Completing Orders
- Finishing certain Dangerous or Forbidden Glade events
- Sending Abandoned Caches to the Citadel
- Keeping villagers happy (maintaining high Resolve)
Every villager has a Resolve stat, which measures their happiness. When a species’ average Resolve exceeds a specific threshold, they begin generating Reputation every second (passive Reputation gain).
Resolve is affected by:
- Having access to shelters
- Consuming complex foods
- Fulfilling service needs
- Forest Mysteries effects (during the Storm)
- Forest Hostility
- Bonuses from buildings
If a species’ Resolve drops to zero, villagers from that group begin to leave. Each loss increases Impatience.
Impatience is the opposite of Reputation - when the Queen’s Impatience bar fills, your settlement fails. It is constantly grows over time, acting as a soft timer, but can spike if villagers die or leave.
Your goal in most settlements is simple: fill the Reputation bar before the Queen’s Impatience bar fills.
Hostility
Hostility is a core pressure mechanic in Against the Storm. As your settlement grows, Hostility levels rise, lowering villager Resolve and making survival during the Storm more difficult.
Hostility increases from:
- Gaining more villagers (+6 per settler)
- Advancing to a new year (+45 per year)
- Opening Glades (+15 for small, +30 for Dangerous and Forbidden)
- Assigning Woodcutters to chop trees (+24 per worker)
You can view your current Hostility level and its sources at the top of the screen.
Each Hostility level reduces Resolve by:
- -2 Resolve year-round
- An additional -4 Resolve during the Storm (from the default “Hostility of the Forest” Forest Mystery)
Additionally, each Hostility level activates one or more negative Forest Mysteries during the Storm. These effects can be harmful - or even deadly.
How to Reduce Hostility:
Unassign Woodcutters
Temporarily removing workers from Woodcutters’ Camps is a common way to manage Hostility during the Storm.
Sacrifice fuel
You can temporarily reduce Hostility by burning Wood or Coal at the Hearth, but use this as a last resort (unless you have excess fuel), as sacrificing resources consumes them quickly.
Delay Accepting Newcomers
Villagers are a major source of Hostility. You don’t need to accept every group immediately - holding off can keep Hostility manageable, especially when you have enough workers already.
Build Secondary Hearths
Extra Hearths reduce Hostility by -30 each. Just be sure you have enough fuel to maintain them.
Raise the Impatience Bar
Each point of Impatience lowers Hostility by 15. In some cases, letting the Impatience bar rise - rather than forcing it down - can help you stay below a critical Hostility threshold.
Use Buildings and Cornerstones
Two buildings - the Monastery and the Temple - reduce Hostility. Additional reductions come from specific Cornerstones, which lower Hostility under certain conditions (like opening Caches or selling goods).
Orders
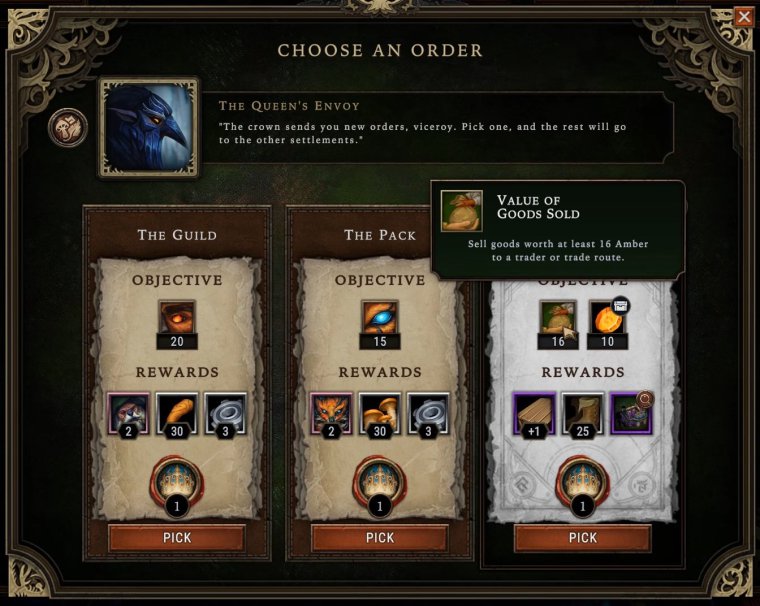
Orders are quests from the Queen. You receive 9-12 Orders throughout a run, with each Order offering two or three choices. You can only pick one option per Order.
Completing an Order grants:
- 1 Reputation point
- Rewards such as villagers, tools, parts, various resources, Blueprints, or Cornerstones that boost production
While the idea behind Orders is simple, their impact on a run is huge. On the easiest difficulty (Settler), completing all 12 Orders is enough to win the game. On Prestige 1 and above, you’ll need 18 Reputation points to win, so Orders alone won’t suffice. Still, they remain valuable, providing new Blueprints and the most reliable way to earn Reputation consistently.
Early-game Orders are typically simpler than late-game ones. Tasks like building shelters, placing camps, or delivering small amounts of resources are easy to complete, and it's up to you to choose the reward that fits you the best. Villagers are a great reward early, as you need more labor to do more things.
Late-game Orders are often more difficult, and sometimes only one option is realistically achievable. Examples of too demanding objectives are:
- Delivering goods you can’t produce
- Constructing a building you don’t have a Blueprint for
- Fulfilling needs for more villagers than you have
- Opening more Glades than you want after your production is already up and running.
A small tip: consider leaving some completed Orders unchecked as a backup plan to reduce Impatience. This strategy works best in the late game when rewards are less impactful.
Species
Your villagers in Against the Storm come from seven different species, each with their own strengths, preferences, and needs. Every settlement is a mix of three species, though the exact combination is random and depends on your chosen caravan.
Assigning a worker to a well-suited building improves their Resolve (which is needed for passive Reputation gain), increases production output, or grants unique bonuses when assigned to the Ancient Hearth. Each species also has distinct needs - only specific complex foods and services increase their Resolve.
For example, a Human settler:
- Starts with 15 Base Resolve
- Gains +5 Resolve from Brewing
- Produces +10% more goods in Farms
- Slows the growth of the Queen’s Impatience by 25% when working as a Firekeeper
- Enjoys Biscuits, Pies, and Porridge
- Is satisfied with Ale if a Tavern is built
You can find all species characteristics in the in-game Encyclopedia. For a complete list of species traits, specializations, and needs, check the Hooded Horse Wiki.
Glades
Resources in the starting area run out quickly, so exploring the forest is essential. Glades are open areas revealed by cutting through surrounding trees.
There are three types of Glades:
Small Glades
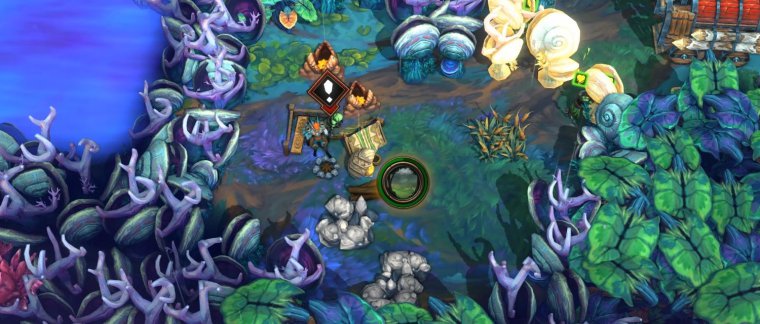
Small Glades are safe but typically less rewarding, with fewer resource nodes. Still, a Small Glade can be exactly what you need early on. The resources found here are low-tier, so your default camps can gather from them without upgrades.
You might get lucky and find 8–10 patches of fertile soil, enough to support a small population through farming. Other valuable finds include Geysers, Encampments, Wandering Traders and Abandoned Caches. Black, Golden, and Royal Stags are unique creatures found only in Small Glades.
That said, opening too many Small Glades is not recommended, as each adds +15 Hostility.
Dangerous Glades
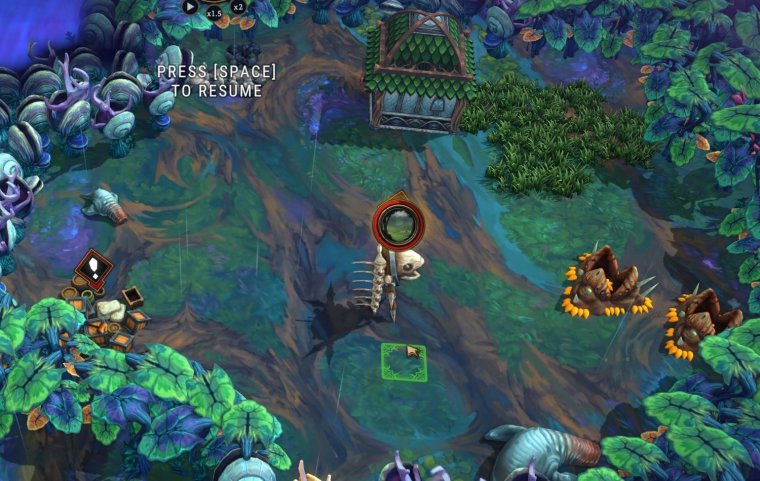
Opening a Dangerous Glade triggers a Dangerous Event - a mini-quest that requires assigning workers and providing specific goods.
You’ll usually have two resolution options with different costs and rewards. Early in the game, choose the option that requires fewer resources and offers a production bonus. Later, you may prefer the option that grants Reputation to finish the game faster.
Besides the main event, Dangerous Glades often contain everything Small Glades offer (except Stags), but in larger quantities and higher tiers: Large Abandoned Caches, Large Encampments and Larger resource nodes.
The penalty for opening a Dangerous Glade is +30 Hostility, twice that of a Small Glade - but due to the rewards, they’re usually preferred by experienced players.
Forbidden Glades
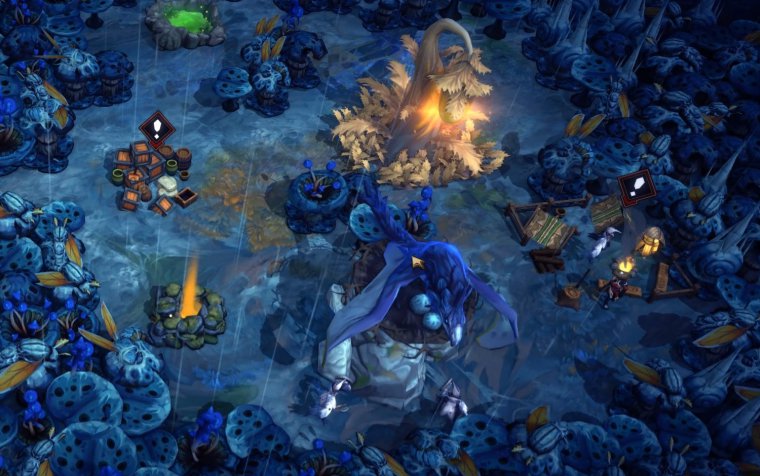
The biggest difference in Forbidden Glades is the event inside. These events have much higher requirements, more punishing working effects, and harsher consequences if you fail to meet the deadline.
Forbidden Glades are also much farther from the starting area, so by the time you reach one, you’ll likely have a stable economy and better tools to handle the challenge.
The Hostility penalty is still +30, same as Dangerous Glades.
Unresolved events often increase the Queen’s Impatience or apply nasty negative effects. That’s why it’s best to open Glades at the end of the Storm or early in Drizzle, so you have time to resolve the event before the next Storm hits.
A common way to deal with Glade Events is to buy the required goods from a Trader, especially in the early game when you don’t have full production chains.
Trading
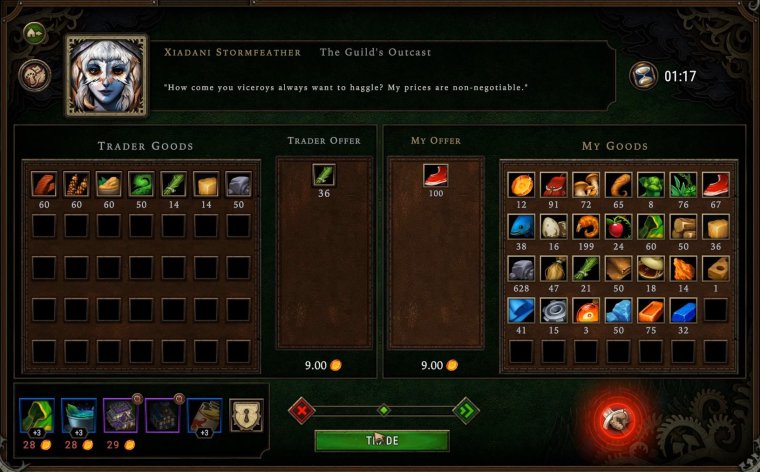
Nearly everything mentioned in this guide - from food production to Glade events - can involve trading. Traders allow you to sell excess goods and fix shortages. Early in the game, buying building materials is especially valuable, since the default Crude Workstation is extremely inefficient at producing them.
To enable trading, build a Trading Post. After that, traders will visit your settlement roughly once per year.
Each trader brings:
- A unique mix of resources, raw or cooked food, building materials, and service goods
- Perks that improve production
- Cornerstones or Blueprints
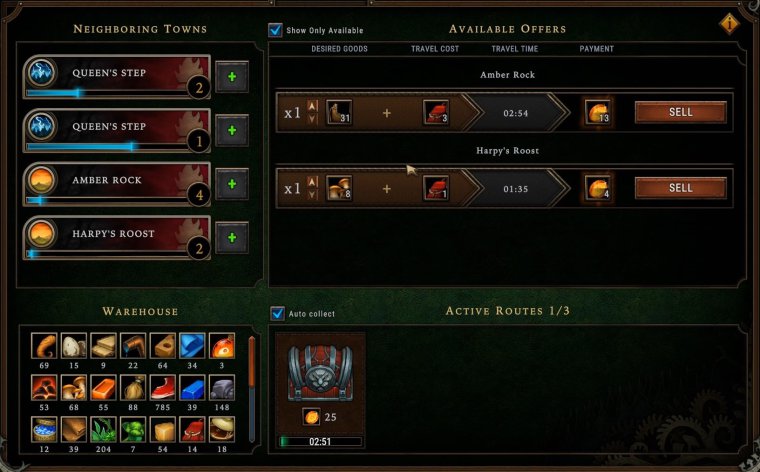
Trade Routes let you export goods to previously completed settlements to earn Amber.
Trade Routes become much more important after Prestige 10, when selling goods directly to traders becomes half as profitable.
Conclusion
Don’t rush through your early runs. Take time to experiment with different species and production setups. Use the Pause button often - to plan or simply read tooltips and event descriptions. The game is designed around decision-making, not speed.
This guide covered the essentials, but there are still systems we haven’t touched - like Biomes, Rainpunk, World Map modifiers, and more detailed production synergies. There’s always something more to learn.
Take your time, make your choices - and enjoy the rain.


